I have already cut the cleats out of hard maple ( 3/4 x 1-1/2 x 12 inches long) I had enough material for 60. A couple extra for repairs if needed.
After the holes are drilled, a couple coats of exterior polyurethane and ready for track assembly.
Yellow Fever
- Attachments
-
- Drill jig was made to clamp part in, then flip over, drill all 4 holes and then remove the part finished so each part is made identical.
- 1019201695925.jpg (108.33KiB)Viewed 29033 times
-
- Entire process of clamping and drilling all 4 holes takes about 1 minute.
- 10302016201239.jpg (114.51KiB)Viewed 29033 times
-
- Part clamped and ready to be drilled.
- 10302016201450.jpg (113.74KiB)Viewed 29033 times
Bring on the snow
Finishing seater
Parts are all painted and upholstery work complete.
- Attachments
-
- The taillight wired. (Checked it out with 12V battery to make sure all was good.)
- 082017104359.jpg (92.9KiB)Viewed 29009 times
-
- Finished seater. I put some non-slip foot treads on the skis.
- 082017104253.jpg (109.62KiB)Viewed 29009 times
-
- Time to get to work. All the parts finished and ready for assembly.
- 11302016184641.jpg (89.7KiB)Viewed 29022 times
Bring on the snow
Finishing grousers
I put my dad to work applying the exterior polyurethane on the grousers. He is retired and always looking for something to do. He went to work and made a special rack for drying.Good thing he has a lot of time on his hands.
- Attachments
-
- This is after the second coat. (Used a gloss finish.)
- 082017104154.jpg (108.54KiB)Viewed 29009 times
-
- Drying maple with a picture of my brothers 600 in the background.
- 082017104119.jpg (118.61KiB)Viewed 29009 times
Bring on the snow
Motor mounts
I needed to repair the motor mounts. It looked like if I could replace the rubber portion of the mount, they could be usable. There was a web site on the forum that you could purchase center bonded mounts and they listed a part number but what I found is that they wanted a $85.00 min order. Instead I found an alternative repair. It looks like it should work fine.
I purchased a drain plug from Menards which had the perfect size rubber pc. in it for less than $4.00 a package. (4X) Then I removed the rubber portion and started to rebuild the mounts.
I purchased a drain plug from Menards which had the perfect size rubber pc. in it for less than $4.00 a package. (4X) Then I removed the rubber portion and started to rebuild the mounts.
- Attachments
-
- Original mounts on left/ New part purchased/New part dismantled/Rubber used for new motor mount(saved original inner sleeve)/ Installed in casting
- 0112017203632.jpg (223.97KiB)Viewed 28990 times
-
- I drilled out all 4 holes in the casting to .875 dia. to make them round and accept the rubber well. Then inserted with large shoulder to bottom of casting.
- 0112017202849.jpg (78.69KiB)Viewed 28990 times
-
- The holes in the rubber came with a .187 hole. After installing in casting I drilled out the holes with a series of drills to get to .500 to fit the inner sleeve.
This worked better in the rubber using small increments at a time. - 0112017202745.jpg (126.78KiB)Viewed 28990 times
Bring on the snow
Motor mounts
Here are a couple of finished pictures of the mounts. This is my 1st go around with something like this, but I think it turned out well.
- Attachments
-
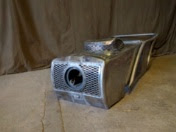
- There is a standard washer on the bolt head and a thick fender washer and locknut on top.
The bolts are a little longer to attach the muffler brackets on one end. - 0112017202642.jpg (59.92KiB)Viewed 28990 times
-
- Ready to bolt on the motor which has been completely gone thru and eagerly waiting to run. (Thanks to my brother Mark for helping with that.)
- 0112017202559.jpg (80.92KiB)Viewed 28990 times
Bring on the snow
Painted parts
My parts are finally coming back from the paint shop.This took longer than I expected, but they did a beautiful job. Unfortunately I am not going to get the 444 done for the big 50th Anniversary Party. I will be there with my brother Mark and his 600.Look forward to meeting the Hus-ski / Diablo crowd.
- Attachments
-
- 0122017211727.jpg (54.18KiB)Viewed 28981 times
-
- I have all the decals ready to put on. (From Barrie)
- 0112017201414.jpg (102.31KiB)Viewed 28990 times
-
- Getting excited to get this finished.
- 11302016184758.jpg (135.35KiB)Viewed 28990 times
Bring on the snow
Building new tracks
The original tracks were in pretty rough shape. When I got the 444 home I couldn't even roll the tracks over the wheels. This machine is getting a new pair of shoes.
Here are a few pics. of the old tracks and also the new. My belting supplier was able to pierce in the hole pattern for the cleats, this sped up the assembly process.
The belt material I bought was 2 ply 220 1/8 x1/16, 5.0" wide and 101" long. It is about .300 thick.
Here are a few pics. of the old tracks and also the new. My belting supplier was able to pierce in the hole pattern for the cleats, this sped up the assembly process.
The belt material I bought was 2 ply 220 1/8 x1/16, 5.0" wide and 101" long. It is about .300 thick.
- Attachments
-
- Old belting badly weather checked.
- 0292017181442.jpg (132.85KiB)Viewed 28959 times
-
- Old grousers were pretty rough with a mismatch of worn and broken ice cleats.
- 0292017181422 (1).jpg (140.81KiB)Viewed 28959 times
-
- The new material waiting for assembly.
- 0292017181655 (1).jpg (97.21KiB)Viewed 28959 times
Bring on the snow
Building new tracks
I have seen different methods used for track assembly. I decided to use stainless 1/4 button head bolts and "t" nuts for the cleats and rivets for the lacing.
I wasn't set up for doing alot of riveting so the bolts seemed to be a good alterative. Being my 1st set of tracks, I'm happy the way they turned out.
Cost wise I am sure rivets would be cheaper than all the bolts and t-nuts.
For the laces I lined them up in position, marked them, removed them and took a hole punch to pierce the 8 holes/ end. Finally reassembled with the rivets, made sure everything was down tight and clinched them over.
The T-nuts I set into the track 1st using a piece of 1" round stock and hammer. I then put my wife to work assembling the ice cleats and grousers with the S.S. bolts. From there I took the assembly and installed on belting using blue locktite. Went together good and we are done.
- Attachments
-
- Bolts and T-nuts I got from Fastenal. Tubular rivets and hand setter from Hanson Rivet.
- 0292017181342.jpg (143.39KiB)Viewed 28955 times
-
- Stainless ice cleats from Bruce.
- 029201718168.jpg (96.5KiB)Viewed 28955 times
-
- I saved the original laces and polished them up. Installed them with tubular rivets.(Looked to be the original method)
- 029201718152.jpg (126.53KiB)Viewed 28955 times
Bring on the snow
-
Go Go Diablo

- Site Admin
- Posts:1838
- Joined:Fri Feb 22, 2008 12:47 am
- Location:Sobieski, Wisconsin
- Contact:
-
Barrie2777

- Posts:1547
- Joined:Tue Mar 04, 2008 9:17 pm
- Location:Arundel Quebec
Re: Yellow Fever
Everything looks fantastic!
444 mufflers are notorious for falling apart. Vibrations from the motor probably do this. The motor is on rubber to absorb the vibrations while the muffler is bolted tight to the motor then bolted tight to the motor support. To avoid this problem I attach the 444 muffler with a support strap to one of the head bolts, eliminating the motor mount brackets.
444 mufflers are notorious for falling apart. Vibrations from the motor probably do this. The motor is on rubber to absorb the vibrations while the muffler is bolted tight to the motor then bolted tight to the motor support. To avoid this problem I attach the 444 muffler with a support strap to one of the head bolts, eliminating the motor mount brackets.