This part however, is not so easy.
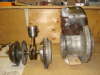
Here's where i did the work. I made a Jig, and installed the dial indicator and made a legend on a piece of paper, so i could keep track of where i hit, and the result. Plus or minus, and if I gained or a lost. If you do not keep track of which end you hit with the "BRASS" hammer, you can quickly get confused.
Also, Notice. I have my crank pin pushed 1/2 way ONLY. Very important. I can not immagine trying to hit and move the crank once it is pressed fully back together.
Here is a picture of my set-up. It does not have to be pretty, BUT it needs to be accurate.


I kept a legend on paper, I marked the crank conterweights with side A and B. And + or -. This way I could remember where I hit last.

I also marded these references on the jig at all 4 corners. Believe me, You can quickly loose track of the last place you hit and gained. Or lost. Each time you get the crank back into the jig, you have to re-calibrate to "0" and make sure you sit in the exact alignment. I spent almost 35 or 40 minutes before i figured out it was better to mark it down on a piece of paper, and keep track of the direction my crank was moving.

As of this very moment. I am dialed in to .006 Inches (I can not or I can not seem to dial it any better)
I have a question to you Bruce. I believe you mentioned that you also had one that would not re-dial at perfect 0 . What was your measurements? Do you remember?